|
Bingo! Found a nice, clean on the inside, sturdy toy chest at a yard sale for fifteen dollars. It didn't fit our décor, but I didn't want to pass up on a solid wood piece that would help us with storage. Also, the lid had a slow close mechanism that was safe for our youngest to get his stuff in and out of without injury. Side note, after having one son fracture his finger messing with his sleeping brother's toes while laying on the couch, I try to keep our doctor's visits down to a minimum; try, being the key word. (In my other son's defense, he was asleep and didn't know that when he rolled over, his little brother's finger got twisted.) 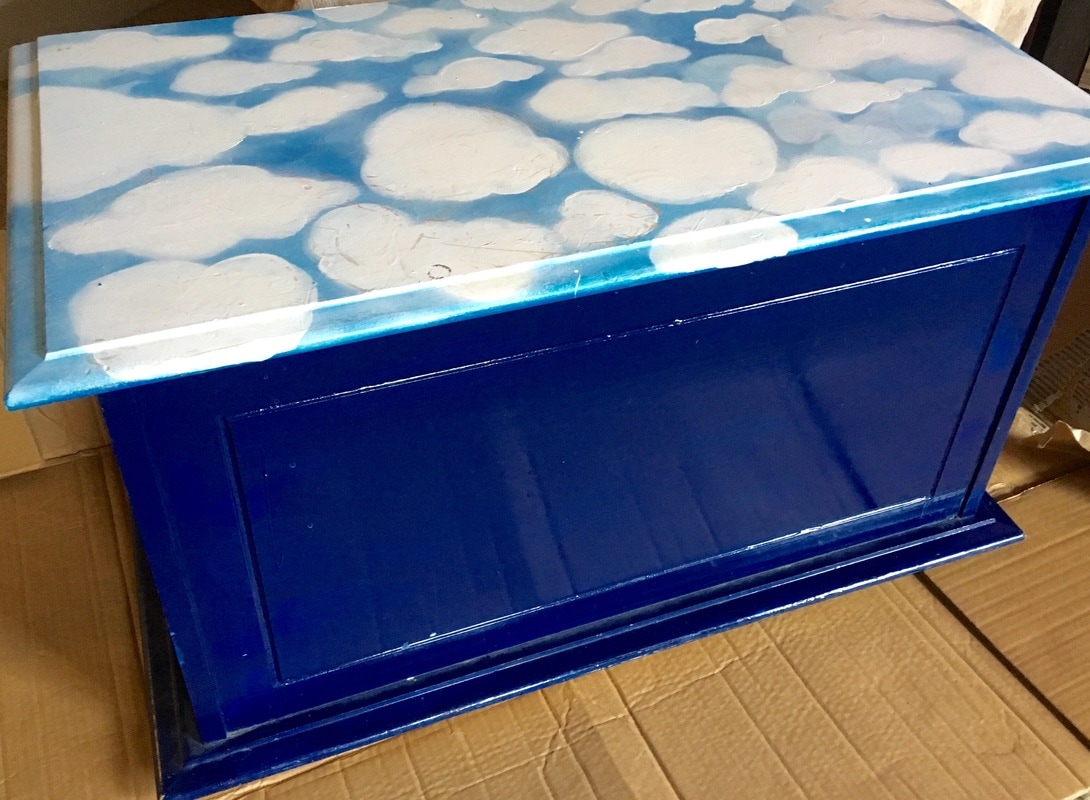 We don't have a play room, so our family room is where we keep most of our boys' toys. It can get ridiculously messy at times, so I'm always looking for ways to keep it organized. Recently we purchased a bedroom dresser to sit under our television because of all the storage space. I wanted to see if I could paint the toy chest to match our family room style. I took to the chest with Kilz and then used the dry brush method, with some left over paint, to create that wood grain look. It turned out really well and matched our storage dresser. 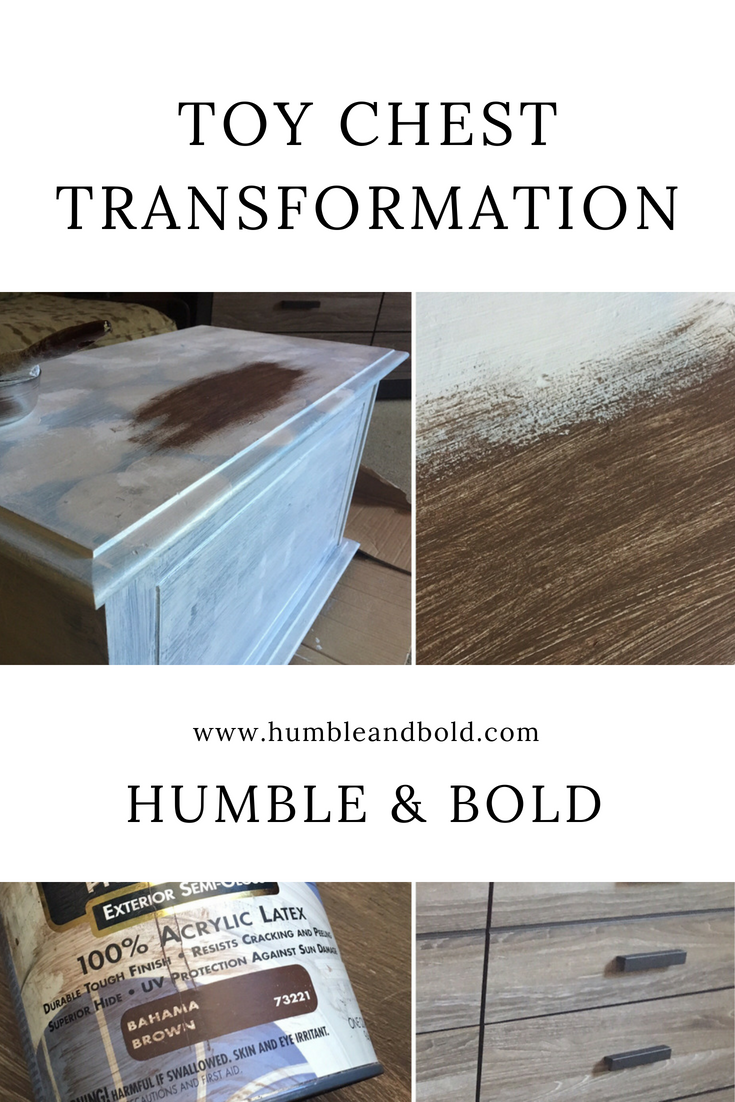 The now matching chest gives us a place to quickly stash toys for when we entertain. Love this piece as a coffee table, but also thinking it might be more useful somewhere else.  Trying to decide if I would rather have it as a coffee table or a storage bench where I can sit with my sons while they practice and play their music. Hmm, thinking I'll keep my eyes open for another toy chest, next time I go hunting.  Thanks for stopping by! By the way, where do you think it looks best? Christina
Stay humble & BOLD! "Thy word is a lamp unto my feet, and a light unto my path." Psalm 119:105 To check out my testimony click here To like my facebook page click here Find me on twitter @humble_bold On Pinterest at humble&BOLD by Christina
4 Comments
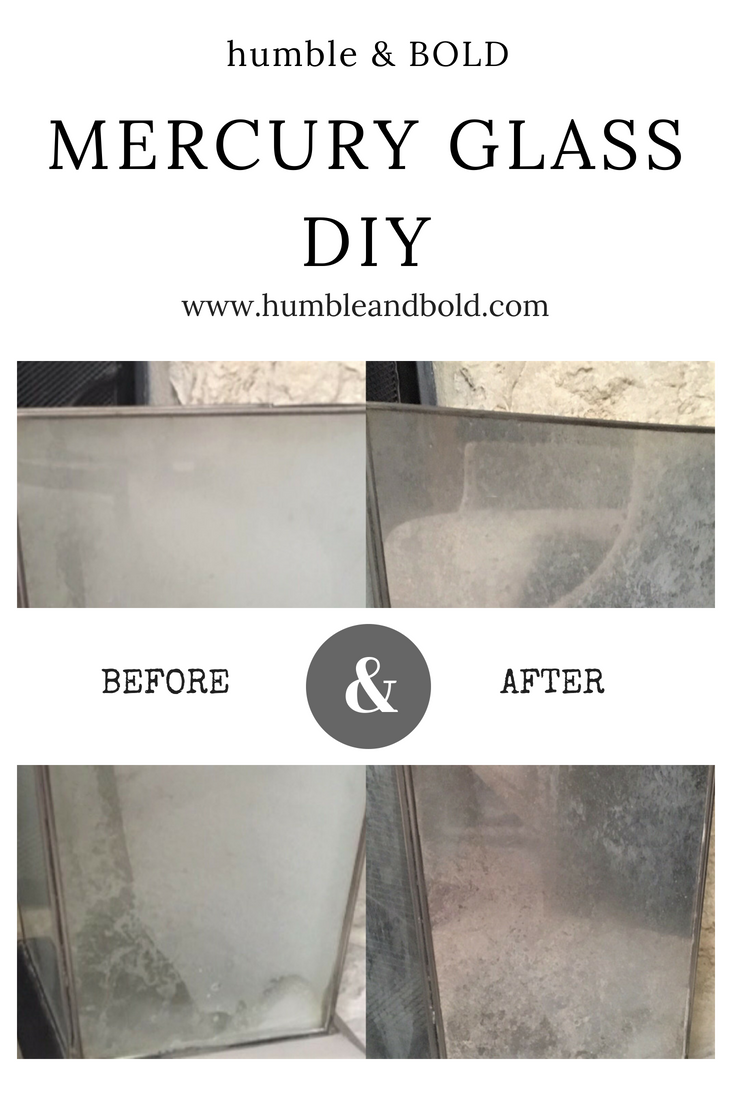
Enjoy transforming the look of regular or frosted glass with this easy do-it-yourself project. The results are amazing!
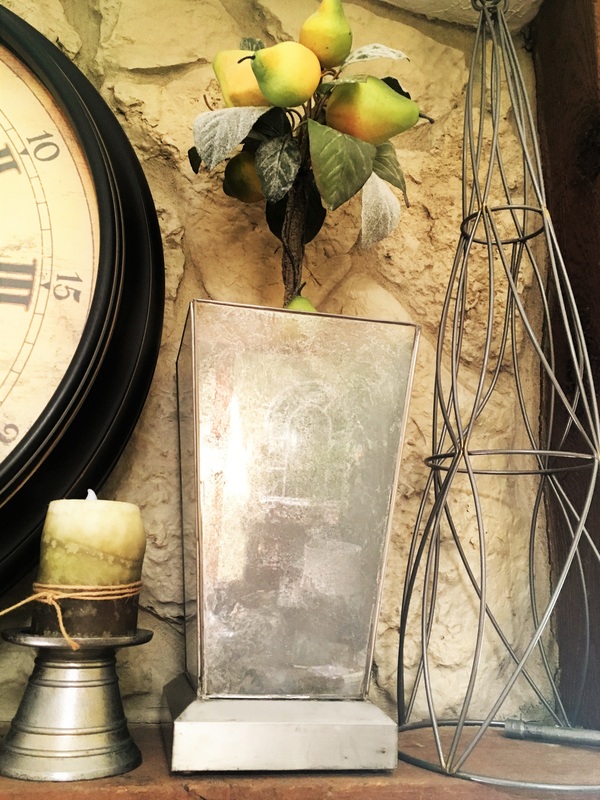
I bought these vintage Art Deco style lanterns for our 1940's style wedding reception and had them displayed on our mantel. After seventeen years of enjoyment, I noticed the frosted glass had thinned out in spots, probably due to the heat of lit candles, and one had a significant crack. I was almost resolved to sell them at a yard sale and to purchase a pair of tall mercury glass vases filled with light artificial greenery to set off my newly refreshed and painted stone fireplace. However, I didn't have an extra hundred in the decorative budget, so I started thinking how I could repurpose those lanterns which already had a sweet sentimental value into something new. I learned a great deal from this tutorial and started to give this DIY a go! 
Supply List
1) Water bottle with equal parts water and vinegar, 2) Krylon Looking Glass spray 3) Tape 4) Protective drop cloth 5) Protective eye wear 6) Gloves 7) Mask 8) Cloth for blotting You can find Krylon Looking Glass spray at Hobby Lobby (use 40% off coupon); the Looking Glass is the one to go with over metallic or chrome sprays, according to advice from friends. I used Scotch tape that I purchased at The Dollar Tree and some left over painter's tape to cover areas that I didn't want painted. Next you will need a sprayer with half vinegar and water. NOTE - Many mercury glass projects spray the Krylon Looking Glass spray on the inside of glass, but for this project, the outside of the glass was the only part sprayed. Also, don't spray inside of glass containers if you are planning to use them as vases with water inside; the water will cause the paint to eventually wash away over time. Now, if you're like me, you might get so excited to start your project that you are tempted to bypass reading the safety instructions, but don't! Make sure you wear safety goggles, gloves, a mask and have exposed skin covered. You will need to do this outside on a day that is not windy.
The picture below shows before and after of how the Mercury Glass DIY project transformed my lanterns. There is such an improvement that I wanted you to see the difference.
Extremely happy with the end result! The pear tree topiaries were gifts from my Grandmother Helen and I used the lanterns as decorative glass planter boxes.
Hope this post inspires you with your Mercury Glass DIY project!
With Love, Christina Stay humble & BOLD! "Thy word is a lamp unto my feet, and a light unto my path." Psalm 119:105 To check out my testimony click here To like my facebook page click here Find me on twitter @humble_bold On Pinterest at humble&BOLD by Christina
Turns out this project was much easier than I thought it would be. I researched painted stone fireplaces and found some great techniques, two of which I combined. There is thedry paint method and the part water, part paint method. I decided to use the dry paint method with a bowl of water on the side; the combination worked perfect for this project.
I will include supplies needed below and a video to help you, should you decide to take the challenge. If you do get inspired by this post, let me know if you have any questions. So happy I finally did it! It looks much lighter and cleaner. 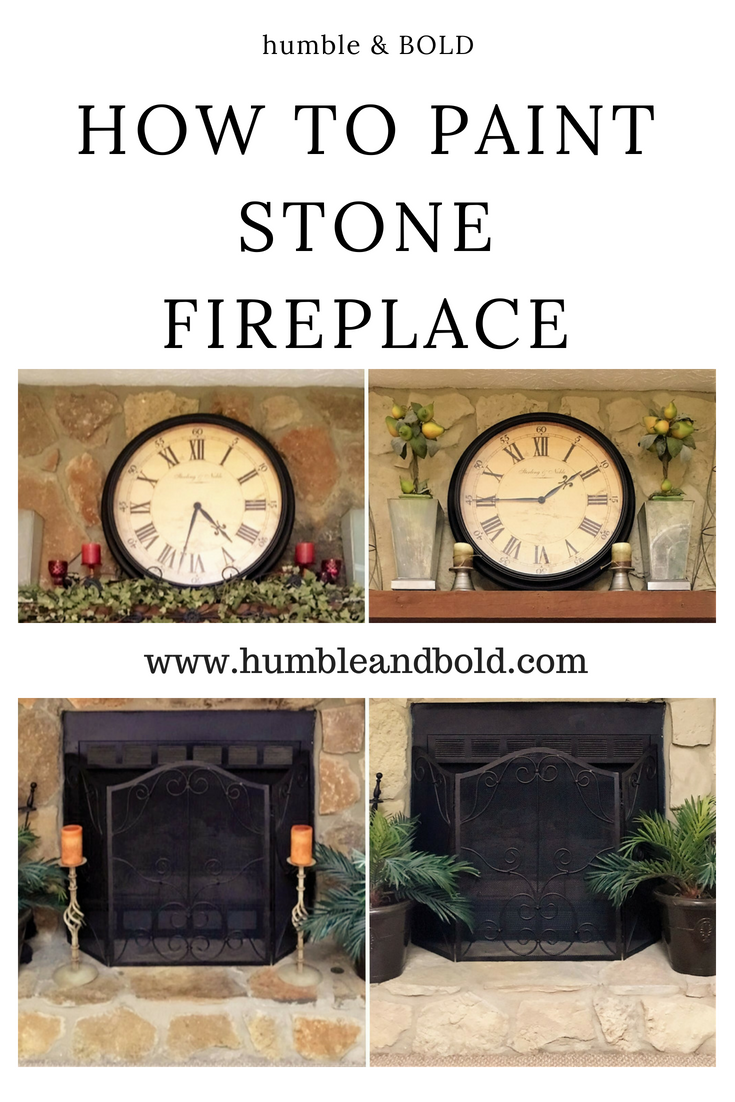
Supply List
1) Vacuum with attachment hose 2) Vinegar, large scrub brush and bowl of water to rinse 3) Thick drop cloth for mantel and hearth 4) Paint (I used a combination of two cans I already had to get the right blended shade of tan and grey.) 5) Large paint brush 6) Containers with wide top opening for large brush to dip in paint and water 7) Rag to soak up excess water and blot paint 8) Cardboard to brush excess paint off
This hearth of stone makeover reminded me of a heart of stone makeover post I wrote last year. If you check out that link, let me know if it spoke to you. Have a great day and don't be afraid to try new projects!
With Love,
Christina Stay humble & BOLD! "And I will give them one heart, and a new spirit I will put within them. I will remove the heart of stone from their flesh and give them a heart of flesh," Ezekiel 11:19 ESV To check out my testimony click here To like my facebook page click here Find me on twitter @humble_bold On Pinterest at humble&BOLD by Christina It all started with an old gazebo tent that suffered damage to the upper frame while being moved. All four sides were still in great condition; gave one to my mother- in-law, sold one, and wanted to use at least one as a garden trellis, but it was hard to find flower boxes wide and deep enough. Also, most large boxes were in the $70.00 - $125.00 range. My husband offered to build one, and it was late in the week, so I asked him if he wanted to wait and see if I found anything at a yard sale. At the time, I just was hoping to get one nice box made to use in front of a stone wall near the entrance to our home. 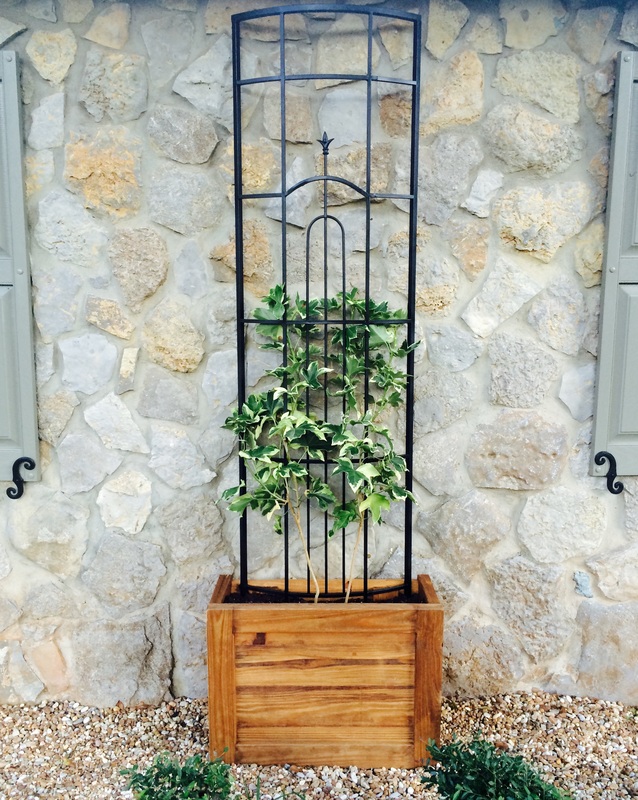 When we got it home, we starting taking measurements and then it occurred to us that we could make two flower boxes. Taking the selves out, we noticed the wood pieces that held the shelves in. We decided we could cut the bookcase down the middle, in two places, on the other side of those wood pieces and then nail the shelves to the outside. Now, it may seem strange to pray about finding the right item to use for a flower box, but to explain, I'm learning to go to God with every large and small concern based on the verse, Philippians 4:6, and really try not to worry about anything, especially the small stuff. After four to five sales, I came across this old bookcase that was selling for $20.00 and I kept looking at it trying to figure out how to make it work as a flower box. It was too big for the area I had in mind, to simply turn over on it's side. It would only work if it was cut in half. The lady having the sale said, "I sell it to you for $10.00, if you're interested." I sent my husband a pic and asked him what he thought. He was good with it, so . . . SOLD! 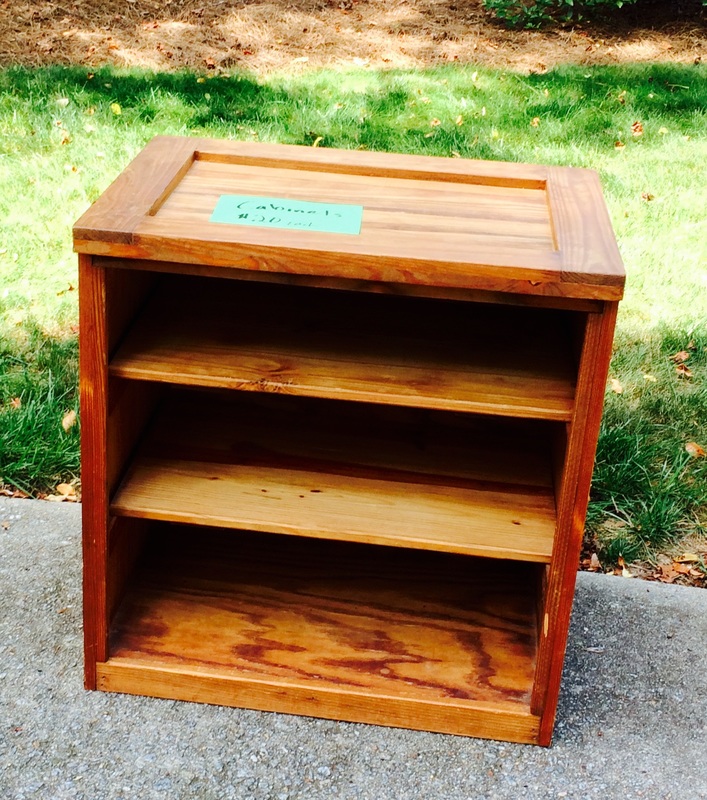  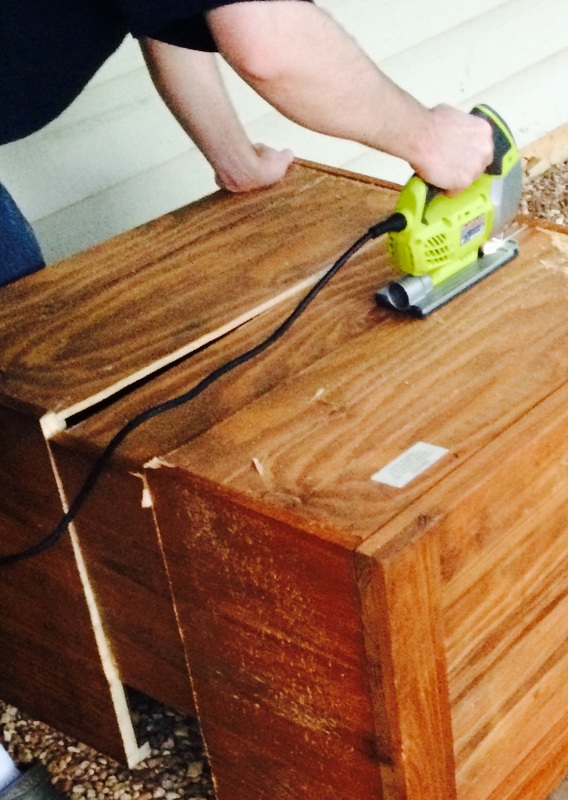 You can see we now have two flower boxes, with not much wood left over. Before filling with potting soil, we remembered to drill holes in the bottom for proper drainage. Here is a view from the back of the bookcase. We used a RYOBI jig saw and safety goggles. Here is the second flower box on our back porch, filled with Jasmine. Think I will plant some marigolds on the sides. 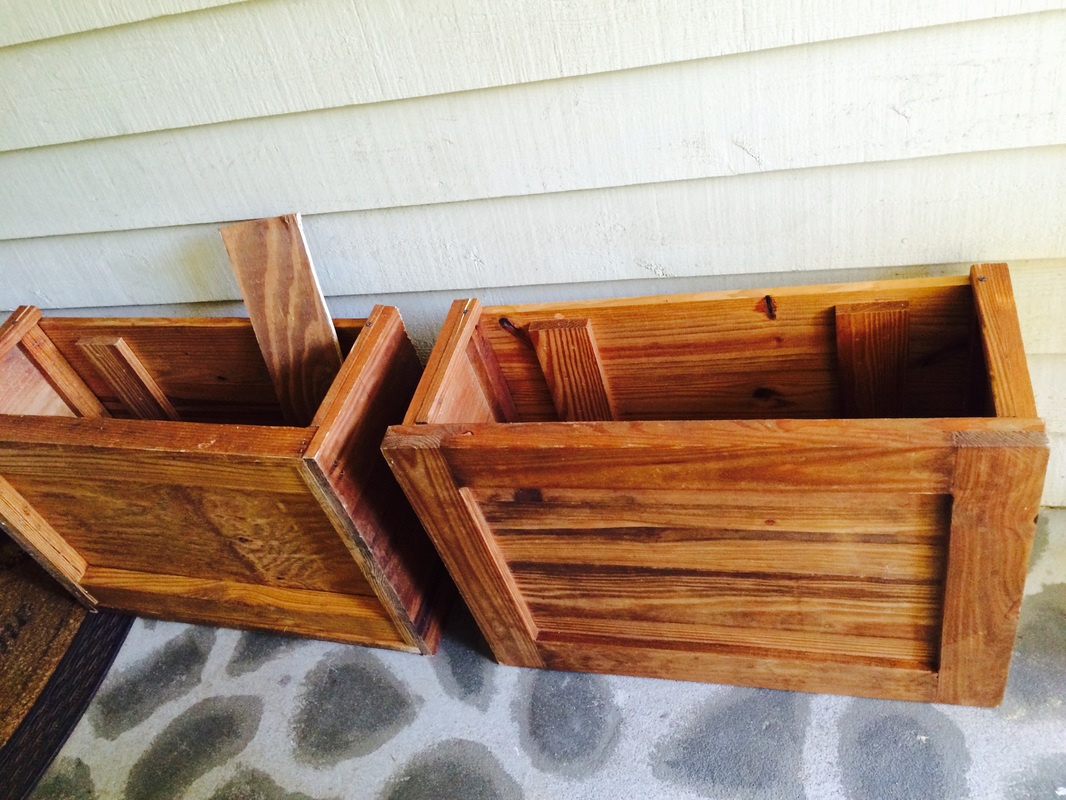 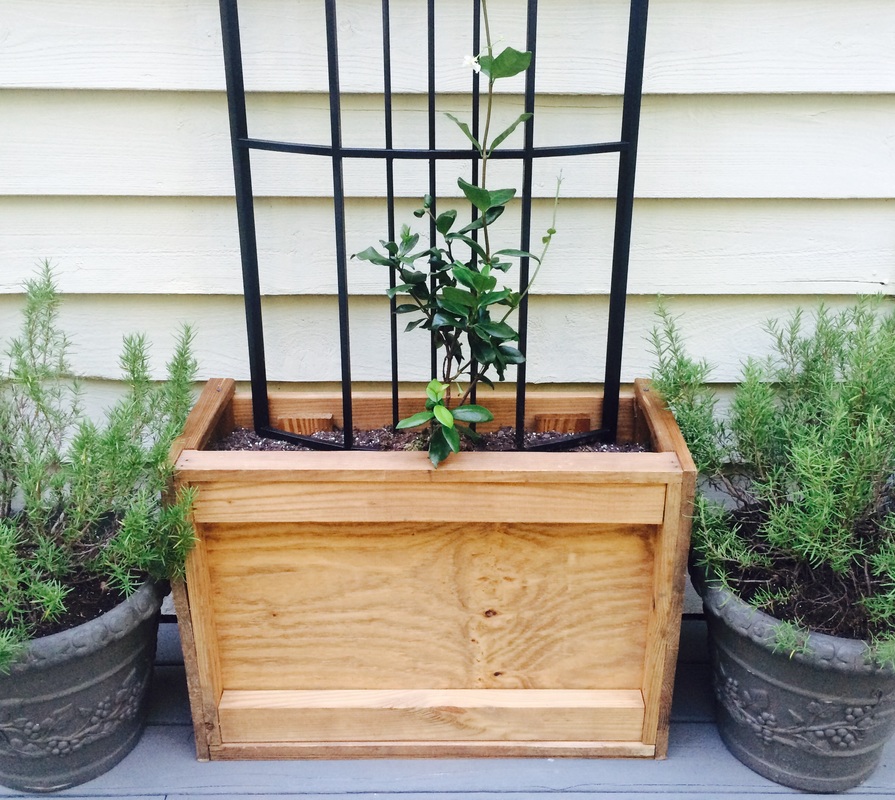 Can you see the face in the wood grain? To me, it looks like a person smiling while talking into a headset, operating an old phone switchboard. What do you see? Very thankful and happy with how well these boxes turned out, I asked God for one and He made a way for two! And one makes for an interesting conversation piece. Thanks for stopping by and visiting! Christina
To find my facebook page, click on humble & bold. Stay humble & be BOLD! Here's the updated pics of how the small (hand cut and frozen) wood props turned out and how they added to the overall decorative centerpiece settings. 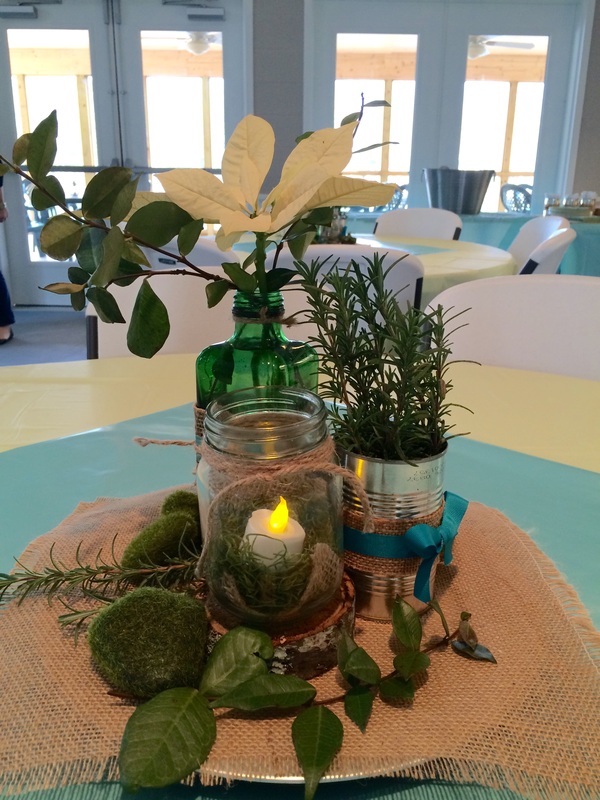 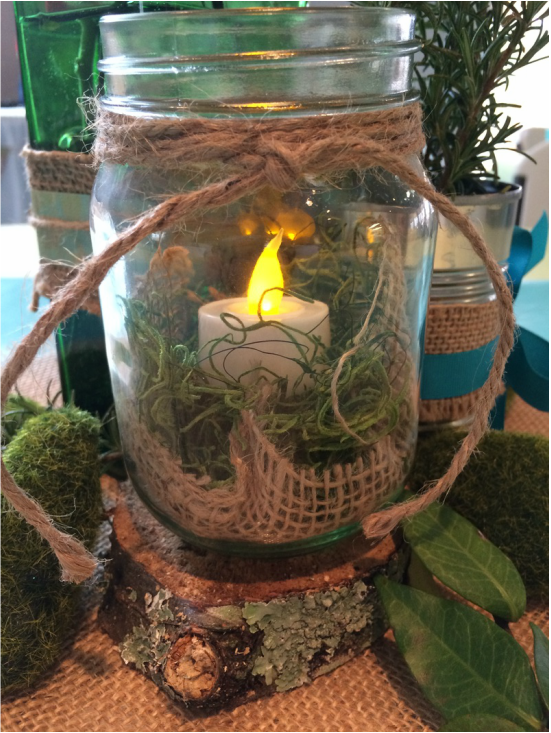 Planning a party this weekend and wanted to have three, small items staggered for the table centerpieces. Only problem was two of the items where the same height. To solve that issue, my husband and I searched for the right size tree limb. He started cutting and I worked on dinner. Just call us "Ma" and "Pa" from Little House in The Suburbs. 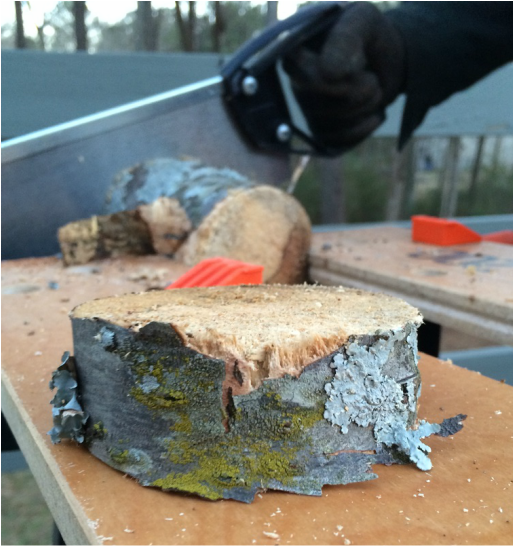 The tree limb had fallen, so the bark wasn't perfectly attached all the way around. It still will make for a nice, rustic, decorative prop. However, since there can be some unwanted pests lurking, I went to eHow and choose the freezing method to prevent any party crashers.  Pa was able to cut six wood props. Will keep you posted on how these centerpieces turn out with updated pictures. Thanks for reading! Christina aka Ma
|

Categories
All
About ChristinaChristina is an 
There are some links on my humble & BOLD site that are affiliate links, which means I receive a small compensation if you purchase the product or service. The compensation will in no way influence the content, posts or topics made on this blog. I only link to products that are highly rated and that I feel would be of benefit to my readers.
Archives
April 2024
|


 RSS Feed